What is EKS and Why It Matters
Before diving into my costly adventure, let’s quickly cover what EKS actually is for those who might be new to the Kubernetes ecosystem.
Amazon Elastic Kubernetes Service (EKS) is AWS’s managed Kubernetes service that handles the heavy lifting of running Kubernetes control planes and worker nodes. Traditional EKS requires you to provision and manage your own worker nodes (usually EC2 instances) where your containers run.
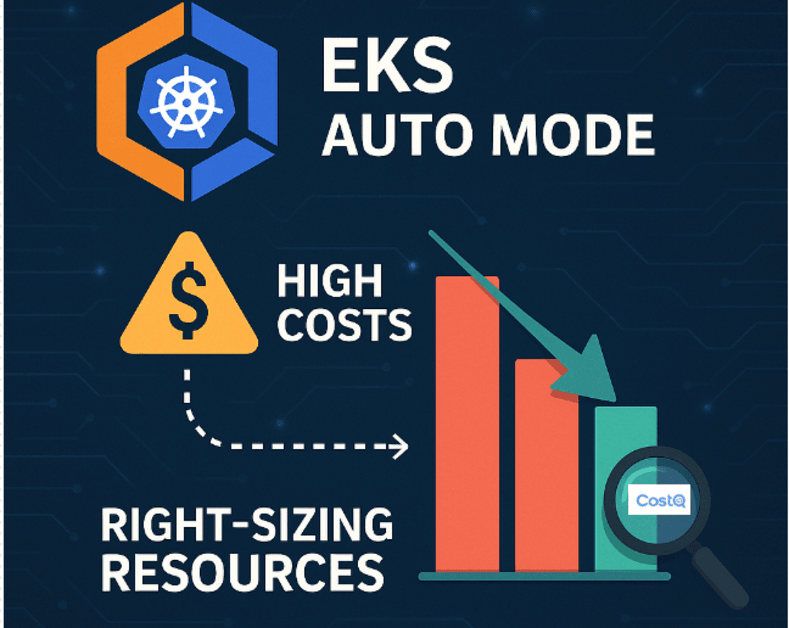
EKS has been around since 2018, but the game-changer came in late 2023 when AWS introduced EKS Auto Mode – their answer to fully managed Kubernetes without node management. Think of it as AWS’s attempt to compete with GKE Autopilot and AKS Virtual Nodes, but with its own unique AWS pricing twist.
Look, I’m not gonna sugarcoat this. When my team first started playing around with Amazon’s new EKS Auto Mode pricing back in April, we were pumped about the “no more node management” promise but absolutely blindsided by the billing.
Three weeks and one scary AWS bill later, I’ve got some war stories to share.
The technical promise is compelling: no more managing node groups, no capacity planning, no dealing with cluster autoscaler configurations or spot interruptions. AWS handles all the infrastructure scaling, security patching, and Kubernetes upgrades behind the scenes.
EKS Auto Mode completely abstracts away the node layer. You simply define your pods, deployments, and services – AWS takes care of placing them on infrastructure that magically appears when needed and disappears when not required.
The pricing looks simple enough:
- $0.0625 per vCPU hour
- $0.0070 per GB memory hour
- Plus the standard $0.10/hour cluster fees
COST ALERT: With EKS Auto Mode, you pay for EVERY requested resource – whether you use it or not. This is fundamentally different from EC2 node pricing!
But here’s what bit us: we’d carried over the same resource requests from our old setup, which were generously padded “just to be safe.” With EC2, those padded requests didn’t matter much – we paid for the nodes regardless.
With Auto Mode? We were paying for EVERY. SINGLE. VCPU. and EVERY. SINGLE. GB of RAM we’d requested – whether we were using them or not.
I wish someone had grabbed me by the shoulders before we migrated and shouted: “Hey dummy! Your overprovisioned resource requests are about to cost you real money!” Would have saved me a lot of explaining to our finance team.
The “Duh” Moment That Changed Everything
I still remember staring at our monitoring dashboard, seeing most pods using like 10-15% of their requested CPU, and having that sinking realization: “We’re paying for 100% of something we’re using 15% of.”
Not my proudest moment as the “cloud cost guy.”
You know that moment when a truth hits you so hard you almost laugh? That was me at 11:42 PM on a Tuesday, illuminated by my laptop screen, finally connecting the dots. I may have uttered several words that I won’t repeat in a professional blog post.
“Of course we’re getting charged for what we request,” I thought. “That’s literally what we told AWS to reserve for us!”
My Real-World Numbers
Let me break this down with a real example from our workflow automation service:
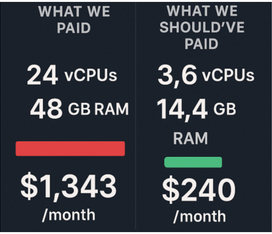
We had requested: 2 vCPUs and 4GB RAM per pod We were running 12 pods Actual usage? Around 0.3 vCPUs and 1.2GB RAM on average
So we were paying hourly:
- 24 vCPUs × $0.0625 = $1.50
- 48 GB × $0.0070 = $0.34
- Total: $1.84/hour or about $1,343 monthly
But we SHOULD have been paying:
- 3.6 vCPUs × $0.0625 = $0.23
- 14.4 GB × $0.0070 = $0.10
- Total: $0.33/hour or about $240 monthly

That’s more than $1,100 in wasted spend. Monthly. On ONE service.
I nearly choked on my coffee when I ran these numbers.
It was like discovering I’d been leaving every faucet in my house running 24/7 and wondering why the water bill was so high. The worst part? This pattern repeated across nearly all our services. Our caution was literally costing us thousands.
How We Fixed It (And What We Built)
The immediate fix was obvious: right-size those resource requests. We started manually analyzing usage patterns and adjusting requests accordingly.
But that was tedious as hell. And we kept having to revisit it as usage patterns changed.
The Technical Details of Resource Right-Sizing
For those interested in the nitty-gritty, here’s how we approached the resource right-sizing:
- Baseline Metrics Collection: We set up Prometheus to collect CPU and memory usage across all our pods with 30-second intervals.
- Usage Pattern Analysis: We developed a simple algorithm that analyzed:
- P95 usage during peak hours (not just averages)
- Weekly patterns (our Monday morning spikes were significantly higher)
- The delta between requested and actual used resources
- Gradual Adjustment: We didn’t slash resources overnight. Instead, we implemented a gradual step-down approach.
- Vertical Pod Autoscaler: For production workloads, we eventually implemented VPA in “Auto” mode for some stateless services, letting Kubernetes automatically adjust our resource requests based on actual usage patterns.
One critical discovery: Auto Mode requires you to be much more precise with resource requests than traditional EKS setups. The old “request what you might need, limit what you never want to exceed” approach becomes incredibly expensive.
That’s when my team decided to build something for ourselves. Call it self-preservation – there was no way I was explaining another bloated AWS bill to our finance team.
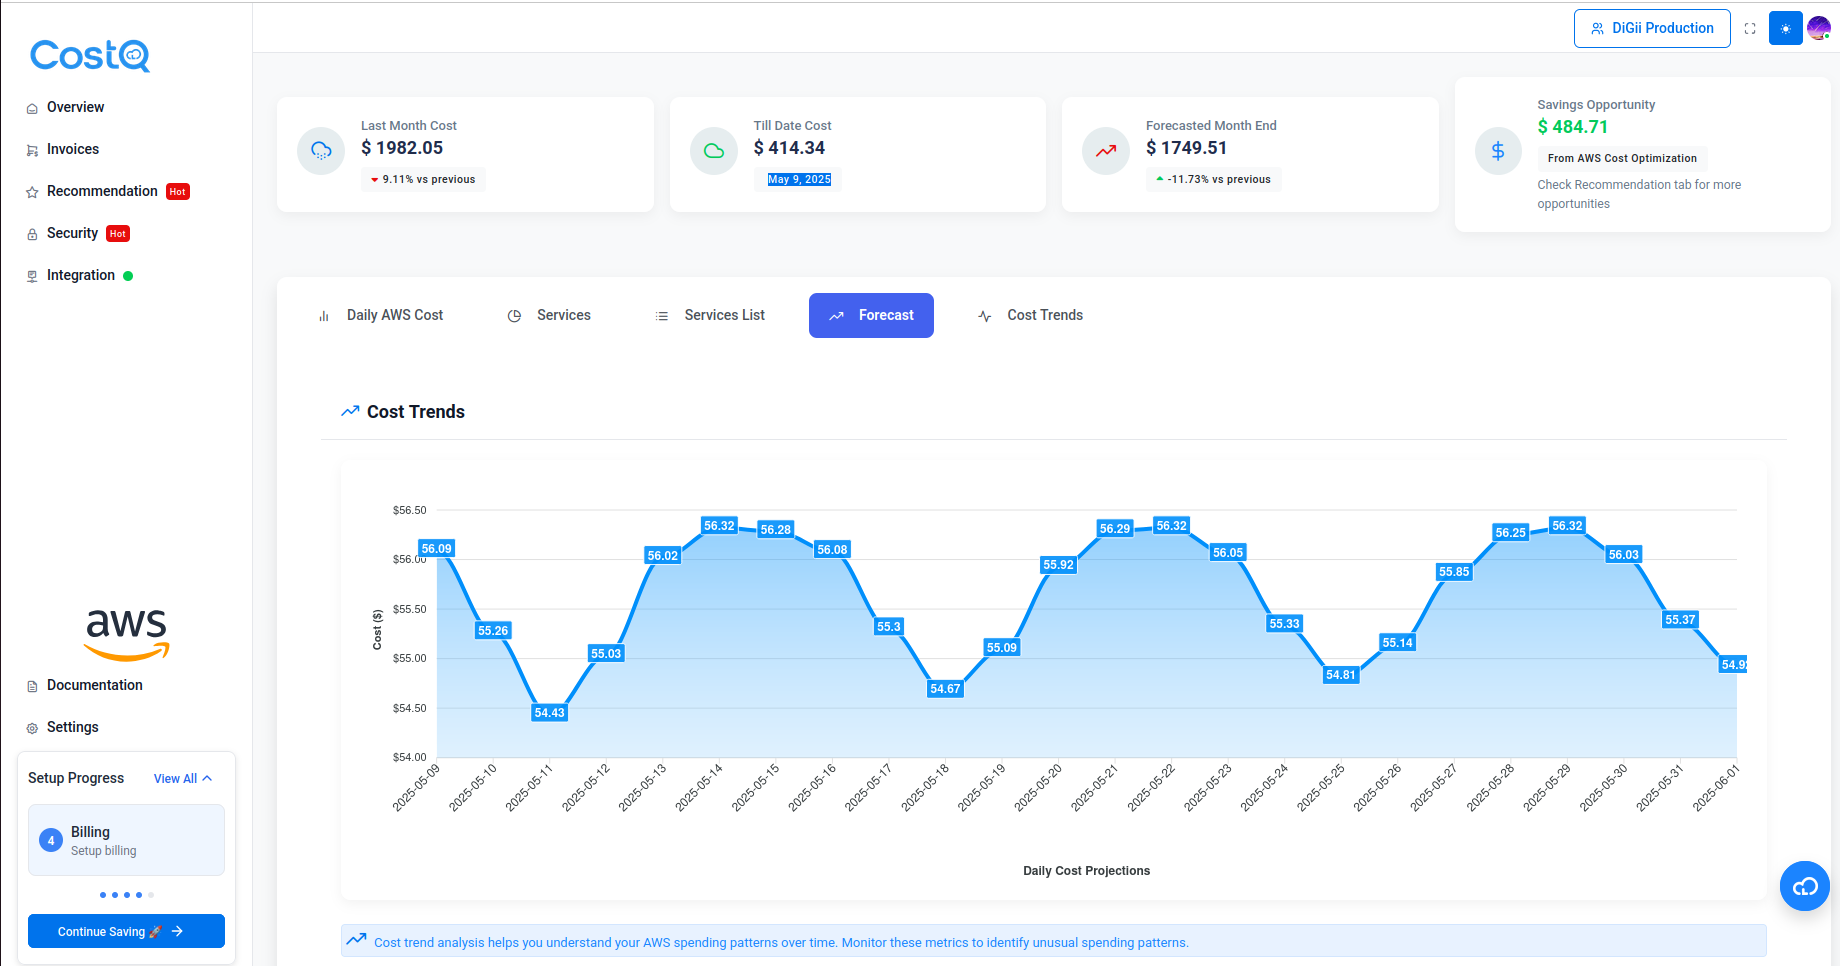
We created what eventually became COSTQ – initially just a simple tool to:
- Track actual vs. requested resources
- Suggest right-sizing adjustments
- Alert us when pods were way overprovisioned
After it saved our butts (and about 40% on our EKS bill), we figured other teams might need it too.
When You Should (and Shouldn’t) Use Auto Mode
After months of running production workloads on Auto Mode, here’s my unfiltered take:
The Technical Limitations of EKS Auto Mode
Before making your decision, you should understand these technical limitations that aren’t clearly advertised:
Auto Mode is fantastic when:
- You’re building something new and don’t want infrastructure headaches
- Your app has unpredictable traffic spikes
- You’re a small team without dedicated DevOps
- You just want things to work without 3am pages about nodes
Skip Auto Mode if:
- You need DaemonSets (learned this one the hard way)
- Your workloads are steady and predictable
- You’re good at optimizing EC2 costs with reserved/spot instances
- You’re running CPU-intensive batch jobs
- You need direct node access for custom monitoring/agents
- Your pods require specific GPU configurations
- You need privileged containers for specialized workloads
- You’re running workloads that benefit from node affinity rules
The DaemonSet limitation hit us particularly hard. In traditional Kubernetes, DaemonSets ensure a pod runs on every node in your cluster – perfect for logging agents, monitoring tools, and security scanners. But with Auto Mode’s node abstraction, this concept breaks down completely. We had to completely rearchitect our logging pipeline as a result.
The Honest Truth About Fargate vs. EKS Auto Mode vs. EC2
PERSPECTIVE: Think of these options as different transportation models – each with its own cost-convenience tradeoff.
OK, real talk based on what I’ve seen across dozens of client environments:
EC2 nodes are like owning a car. More maintenance, but cheaper for daily, predictable use. Best for teams who know what they’re doing and can optimize the heck out of their infrastructure.
Fargate is like using Uber. More expensive per ride, but no maintenance headaches. Great for teams with diverse, spiky workloads.
Auto Mode is like having a personal driver on retainer. The most convenient option, but you’re definitely paying for that convenience. Perfect for teams who value time over money.
I had a client once ask me which one was “best,” and I had to laugh. It’s like asking whether buying a car, using Uber, or hiring a chauffeur is “best” – it completely depends on your situation! For our startup clients running at full speed, Auto Mode makes perfect sense. For our enterprise clients with stable workloads and dedicated platform teams, the EC2 savings are substantial.
Auto Mode Architecture Considerations

One aspect that’s often overlooked is how Auto Mode influences your architectural decisions. In our experience, the pricing model pushed us toward certain patterns:
- Microservices Got Smaller: Since we pay per resource, we found ourselves breaking down larger services into even smaller components to optimize resource usage. What was once a monolithic service became 3-4 specialized microservices, each with precisely tailored resource requests.
- Event-Driven Everything: We shifted more workloads to event-driven architectures, with services that could scale to zero when idle. Lambda still made more sense for truly intermittent workloads.
- Ephemeral Jobs Replace Long-Running Services: We refactored several background processing services into Kubernetes Jobs that spin up, complete their work, and terminate – only paying for resources during actual processing time.
- Multi-Tenant Efficiency: For internal tools used by small teams, we consolidated multiple small services into multi-tenant applications to avoid the overhead of many under-utilized pods.
The pricing model actually forced us to build better applications. Funny how a direct financial incentive can suddenly make “best practices” so much more appealing! Our architectural reviews started including questions like “Do we really need this service running 24/7?” that we should’ve been asking all along.
How We Saved a Client’s AWS Budget
 Last month, we onboarded a fintech startup that had gone all-in on Auto Mode. Smart team, cool product, horrific AWS bill.
Day one with COSTQ installed, we identified:
- 23 development pods that nobody was using but were still running 24/7
- A batch job with a memory leak gradually eating more RAM but never crashing
- Resource requests that were copy-pasted from Stack Overflow posts (we’ve all been there, no judgment)
Just by fixing these three issues, their monthly EKS bill went from $8,200 to $4,700.
The CTO literally sent me a bottle of whiskey. (Thanks, Mark!)
And you know what? That whiskey tasted especially sweet knowing we’d saved them enough to hire another developer. There’s something deeply satisfying about finding and eliminating waste – it’s like detective work but with an immediate payoff. Their lead developer told me later they’d suspected something was off but couldn’t pinpoint the issue until they saw our visualizations. Sometimes you need that outside perspective to see what’s hiding in plain sight.
My Top “Don’t Make My Mistakes” Tips
If you’re diving into Auto Mode, learn from my pain:
-
Start lean with resource requests
-
Set up monitoring before migration
-
Use namespaces for separation
-
Implement autoscaling based on real metrics
-
Build scheduled scaling for predictable patterns
-
Use pod disruption budgets
-
Configure resource quotas
-
Use init containers sparingly
-
Set up AWS Cost Anomaly Detection
-
Create custom CloudWatch dashboards
I learned #1 the hard way. We initially set our requests based on “what the app might need on the worst day of the year” rather than “what the app typically needs with room to scale.” When performance testing showed a service might need 2 vCPUs under extreme load, we’d set that as the baseline request… then pay for it 24/7/365, even though that extreme load happened maybe once a month.
The scheduled scaling (#5) was a game-changer for us. We had dev environments running full capacity overnight when nobody was using them. Setting up a simple CronJob to scale those deployments down after hours and back up before the workday saved thousands with zero impact on developers. Low-hanging fruit at its finest!
Advanced Resource Optimization Techniques
For teams really looking to squeeze efficiency out of Auto Mode, we’ve had success with these more advanced techniques:
Workload Classification: We categorized our services into three tiers based on criticality and resource needs:
- Tier 1 (Mission Critical): Conservative right-sizing with 30% headroom
- Tier 2 (Business Important): Moderate right-sizing with 20% headroom
- Tier 3 (Internal/Dev): Aggressive right-sizing with 10% headroom
Custom Resource Metrics: We developed custom metrics for Java applications that account for garbage collection patterns, helping us set memory requests that prevent both OOM issues and resource waste.
Canary Deployments: We use canary deployments not just for testing features, but for validating resource configurations before full rollout.
Future of EKS and Container Pricing Models
Looking forward, I expect AWS to refine the Auto Mode pricing model based on customer feedback. Google and Microsoft have already taken slightly different approaches with their serverless Kubernetes offerings.
GKE Autopilot, for instance, charges a premium on vCPU/memory but includes the control plane cost. Azure’s AKS Virtual Nodes pricing through Azure Container Instances (ACI) uses a different billing model altogether.
I won’t be surprised if AWS introduces some form of commitment discount for Auto Mode in the coming year – perhaps an “EKS Reserved Capacity” option for teams with predictable workloads who still want the management benefits.
The Raw Numbers: Our 6-Month Cost Comparison
For complete transparency, here are our actual numbers across three similar environments over six months:
| Environment | Solution | Monthly Cost | Engineer Hours/Month |
|---|---|---|---|
| Production | EKS Auto Mode (optimized) | $5,240 | ~5 hours |
| Production | EKS with EC2 (optimized) | $3,890 | ~22 hours |
| Production | EKS with EC2 (spot) | $2,760 | ~35 hours |
Is the ~$1,350 monthly premium worth saving 17 engineer hours? At our fully-loaded engineer cost (~$120/hour), that’s about $2,040 in engineer time saved. So yes, the math works out.
Bottom Line: Is It Worth It?
After all the optimization work, are we still using AWS couldn’t find any internal links in your content Auto Mode? Absolutely.
Is it the cheapest option? Nope, not even close. Our optimized EC2 setup still costs less.
But the time we’ve saved not managing nodes, troubleshooting autoscaling issues, and dealing with capacity planning has been worth every penny of the premium.
My philosophy has always been: optimize for the scarcest resource. And in our case, engineer time is way more valuable than AWS dollars.
When Auto Mode Truly Shines
The scenarios where Auto Mode has proven most valuable for us:
-
Development environments where predictability and ease of use outweigh cost concerns
-
Rapidly growing applications where capacity planning is challenging
-
Teams transitioning from serverless who need more control but aren’t ready for node management
-
Multi-region deployments where managing node groups across regions becomes complex
What About You?
I’m curious – have you tried Auto Mode yet? Hit me up in the comments with your experience. Did you have the same “holy crap, this bill” moment I did? Or did you go in smarter than we did?
And if you want to see how COSTQ could help with your setup, my DMs are open. No sales pitch, just engineer-to-engineer chat. Hit me up in LinkedIn.
Technical Resources for EKS Auto Mode Optimization
If you’re looking to dive deeper into optimizing your EKS Auto Mode deployment, here are some resources that helped us:
-
AWS Official EKS Resource Allocation Best Practices
-
Kubernetes Vertical Pod Autoscaler Documentation
-
Prometheus Operator for Kubernetes Monitoring
-
CloudWatch Container Insights Setup Guide
-
Our COSTQ GitHub Repository – Check out our open source tools!
Meet the COSTQ Team
While I’ve been the face of this blog post, I want to acknowledge the incredible engineering team that built COSTQ:
- Nabin Adhikari – Co-Founder & CEO, Operating Easyfiling as well as 10+ years in the field. Leads product vision and strategy
- Nitesh Karki – CTO Cloudlaya, Inc | CostQ.ai | Empowering Businesses to Maximize AWS ROI
- Sudeep Mishra – Lead Full Stack Developer who architected our resource analysis engine
-
Bijay Aacharya – DevOps engineer who built our Kubernetes operators
-
Suraj Gaire – Frontend developer who created our visualization dashboards
-
Sandeep Phuyal – Data scientist who developed our predictive scaling algorithms
Where to Go From Here
If you’re interested in giving EKS Auto Mode a try (or optimizing your existing setup), I’d recommend:
-
Start with a non-critical workload
-
Monitor, monitor, monitor – before, during, and after migration
-
Set up proper budget alerts from day one
-
Consider tools like COSTQ to help with right-sizing
Frequently Asked Questions About EKS Auto Mode
Q: How is EKS Auto Mode different from Fargate?
A: Think of Auto Mode as “Kubernetes without the node headaches” while Fargate is more like “containers-as-a-service.” Auto Mode gives you full Kubernetes API compatibility with consumption-based pricing, while Fargate has more limitations but can be cheaper for certain workloads. I’ve found Auto Mode better for teams who live and breathe Kubernetes.
Q: Can I mix EKS Auto mode with regular EKS node groups?
A: Absolutely! We run a hybrid setup where our stateless services use Auto Mode and specialized workloads (like our ML pipeline) use traditional node groups. It’s like having the best of both worlds, though it does require thoughtful namespace planning.
Q: What happens to my pods during scaling events?
A: Without proper Pod Disruption Budgets, it can get messy – trust me, we learned this one the hard way! Set up those PDBs unless you enjoy 3am alerts. Auto Mode respects these settings, but you need to configure them properly or your app availability will suffer during rebalancing.
Q: Is there any way to get cost discounts with Auto Mode?
A: Unfortunately not in the same way as EC2 Reserved Instances. Your enterprise discounts still apply, but there’s no “Auto Mode Savings Plan” yet. For predictable workloads, we found traditional nodes with Savings Plans still saved us about 30% despite the extra management overhead.
Q: How well does EKS Auto mode handle traffic spikes?
A: Way better than traditional node groups! When Black Friday hit one of our retail clients, Auto Mode scaled like a champ while their old EC2 setup would have melted. There’s still a 10-30 second delay before new resources come online, so proper readiness probes are essential.
Q: How do you debug issues without node access?
A: It’s definitely an adjustment. We’ve become masters of in-container debugging and enhanced application logging. Tools like Datadog or Prometheus with custom exporters become your best friends. You start thinking differently about observability when you can’t SSH into a node.
Q: Will my AWS bill actually be higher with Auto Mode?
A: If you just lift-and-shift your current resource requests? Almost certainly yes! Our first bill nearly gave our CFO a heart attack. But with proper right-sizing, we cut our initial Auto Mode bill by 40%. The key is matching your requests to actual usage, not theoretical maximums.
TL;DR:
- EKS Auto Mode promises convenience but can lead to surprisingly high bills
- You pay for every requested resource, even if unused
- Right-sizing resources saved us 40% on our AWS bill
- Built COSTQ tool to track and optimize resource allocation
- Still using Auto Mode despite higher cost – engineer time is more valuable
About the Author: